

A few weeks ago, while giving a Monotype demo at the Eugene!Print event, I was telling folks that I read about ways to make Monotypes at home without a printing press. I read that some people make prints by rubbing a spoon on the back of the paper and other printmaking life hacks. I decided it's time I put these theories to the test and make my own home-made Monotypes, using things that are easy to come by.
My first stop was the hardware store, where I picked up some standard-size, per-cut Plexiglas plates. I also bought some sand paper to sand my plates. I learned from our superb print-shop tech Mika, that this is an excellent way to make the plate's surface easy to paint on with watercolors. A plate that hasn't been sanded makes the water bead-up, and it's very hard to make distinct lines or shapes. You can play with how much you sand your plate. There were times when I painted on plates that were still a bit slippery, and I enjoyed the lack of control and splatter-marks that came out. (Here is an example of a piece I made in December 2013 on a plate that wasn't sanded. You can really see how the water beads around the form!)


Next, place the paper, carefully, on top of the plate. Do it in one go, otherwise you can start smearing your image. Before placing the sheet, try to align the edges of your image with the edges of the paper.
Below you can see what I tried to replace the press: little spoon, big spoon, and rolling pin. The basic idea is to find something that will put enough pressure on top of the paper in order to transfer the image without ripping the moist paper. The best results that I got so far were with the rolling pin. I made sure to place my plate on a hard surface (like cement steps) so that I can put a lot of pressure on a flat surface. My rolling pin was ceramic.To simulate a printing-press, a metal rolling pin may be better. If I find one, I'll give it a try and let you know how it went! If you folks at home have a better press-substitute idea, please let me know!! :)


Touching Up

In most cases, when I try to touch-up monotypes they come out looking weird. It almost feels like trying to reenact a spontaneous funny moment: kind of off, and never the same. The print has its own textures and accidental moments that weren't planned, so they are hard to mimic. I often wish it was easier to touch-up a print. Many prints come out with many little beautiful moments that I love, but as a whole, the prints suck! (a metaphor for life, if I ever typed one.)
That said, I am going to give you some ideas on what you can do with a monotype that you like- but wish was better. From the examples above and below: you can paint on it using the same medium (watercolor). You can introduce line to work with, or change the arrangement of existing shapes, making them into something else (here I used a Copic liner). You can also use opaque paint to touch up, or to paint on top of the transparent shapes (here I used white gouache to clean up some messes).
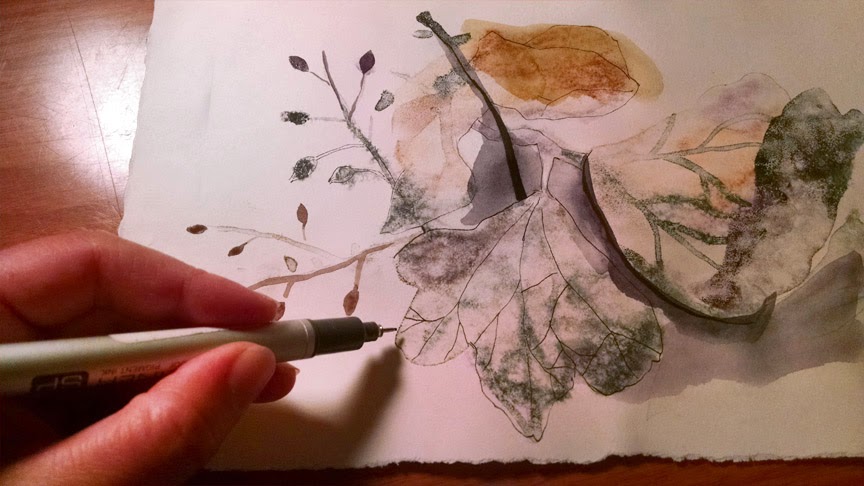

Below are the pairs of monotypes before and after fixing (left:before, Right: after). One thing to keep in mind while touching up, is how to preserve the spontaneous feel of the printed textures: don't try to make it into something else, work with what's already happening on the page.


These are just a few ideas, try it your own way, and have fun!!

Absolutely Fabulous xxx
ReplyDeleteI think it will be better to use the Big shot from Sizzix , than a rollingpin,
ReplyDeleteCan you use fabric as your medium. This is wild and beautiful. Ann Powell
ReplyDeleteLovely! You have delicate style.
ReplyDeleteI found a Japanese Rice Spoon/spatula works well as it has a large flat area on top to rest your fist in so you can apply your weight as well and a fairly large flat-ish bottom. For a bit of money (i just got one on sale for $219, usually $100. more, I bought a sissix big shot pro. It is a die cutting machine, but works just like a press for way less. The really good part is it's 13 inches wide and you can make very long lengths, but it is light enough to lift and can fit on a small card table easily.
ReplyDeleteThank you for the inspiration -- your prints are beautiful! I am also excited to try this on fabric.
ReplyDeleteYour printed monotypes are beautifully delicate. I use dishwashing soap with good quality watercolour paint. It sticks to the perspex plate well and lifts off cleanly with damp paper. I have only used it through a press though
ReplyDeleteYou mix the soap in with the paint or coat the surface of the plate with soap first? Thanks
DeleteNo, you coat the plate with a very thin layer of dish soap, straight from the container (not diluted)and let it dry. Then paint your watercolor on the plate. The soap reduced the watercolor beading.
DeleteWhat fabulous tips. I may never do this but it is very kind of artists like you to share your ideas. Thank you.
ReplyDeleteThis was my thoughts exactly. Very kind!
Delete